


Ingredients
1. Fabric (Cat paw print, Approx. 1.5m)
2. Wool (Red, black, cream)
3. Wool needles
4. Pillows X 2
5. Buttons - Different sizes (Yellow and blue)
6. 1 Large button (Blue)
7. Felt (Dark pink, baby blue and cream)
8. Denim Fabric (Approx. 0.5m)
9. Chalk(White)
Method
1. Measure fabric to pillows and cut two squares of fabric to cover them.
2. Place the 2 pieces of fabric together right sides together. Sew closely around the edge in yellow or blue wool and leave one side open so pillow can slide in. Sew a large button on the opening side so it's easy to open and close.
3. Cut a square of denim approximately 22cm square.
4. Draw a picture of a cat's face on the denim. Following the design of the cat face, sew on some yellow buttons with red wool, see example.
5. Sew on two blue buttons on the denim, with the red wool, to make the cat's eyes.
6. With black wool sew on whiskers and cut out a nose and tongue from the pink felt. Sew them on the denim with red wool.
7. After you've finished the face sew the square onto the base fabric with cream coloured wool.
8. Then add 2 small paw prints for a boarder, made from pink and cream felt, sewn with black and red wool.
9. Put the pillow case over the pillow and fasten the button on the open side.
10. Repeat the steps using a dog face design to make a button pillow dog portrait.
Read more...
Thursday, February 26, 2009
Tuesday, February 17, 2009
Valentine's Day Card

What you'll need:
- Design cardstock
- Dark green embroidery thread
- Green felt
- Lime green felt
- Wooden beads small
- Needle
- 1/4"x 5"green ribbon
- Glue gun
- Colored paper (2 colors)
- Thin wire 2"
- Pencil/ Ruler
- Glue stick
- Scissors
- Pattern
How to make it:
Step 1: Card Pattern
- Trace and cut card pattern with design cardstock.
- Trace and cut heart pattern with color paper.
- Trace and cut pea pod pattern with green felt.
- Trace and cut pea pod tip pattern with lime green felt.
- Cut out (2) small hearts with color paper. (We used pea green.)
- Curl two small pieces of thin wire. (Twist them around a pencil to get even curls.)
Step 2: Pea Pod
- Stitch along edge of pod with green embroidery thread
- Glue two small wooden beads in the center of pod
- Fold edges together
- Place a dab of glue on the inside ends of pod and pinch sides together
- Wrap lime green pea pod tip around top end of pod
- Glue tip in place
Step 3: Finishing Touches
- On the card, use green embroidery thread to stitch around the inside of the edge of heart cut out.
- Wrap the pea pod tip piece around the pea pod and glue in place. Then glue the whole pea pod to the front top center of cut out heart.
- Glue curled wire to the tip of pod.
- Tie a small bow with the 1/4" ribbon.
- Glue bow on front top center of cut out heart, over the very tip of the pea pod and the wire.
- Glue the paper heart cut out on the inside center of card with glue stick. Make sure the pea pod, wire, and ribbon show through the cut out heart shape of the card.
- Glue 2 small hearts on top of the cut out paper heart with glue stick. We placed ours on either side of the pea pod.
Tips:
- You can replace felt pea pod with a paper cut out.
- Needles and wire have sharp ends. If little ones are completing this craft, have an adult do the steps involving the sewing and wire.
Read more...
Heart-in-Hand Valentine Card
Things You’ll Need:
- Brushes
- Crayons
- Fabrics
- Glues
- Paints
- Foil-wrapped Candy Hearts
- Heart-shaped Cookie Cutters
- Scissors
- Scissors
- Card Stock
- Construction Paper
- Markers
- Pencils And Erasers
- Crayons
- Markers
Step1
Step2
Trace your hand or a child's hand on the front of the card using a pencil. Make sure you center the hand while tracing. Be careful that the hand does not move during tracing. Step3
Look at the hand after you trace it and be sure it is a shape you like. Make any corrections, such as straightening any wobbly lines. Step4
Extend the hand to the bottom of the card or draw a line closing it off at the wrist. Step5
Draw or trace a small heart in the center of the palm area of the hand using a pencil. A small, heart cookie Step6
Go over the hand and heart outlines with marker, crayon or paint. Erase any pencil lines that can be seen. Step7
Paint or color-in the heart and hand. For the best contrast, use different colors for the heart and hand. Add fingernails to the hand if you like. Step8
Decorate the rest of the card with complementary colors and designs. Step9
Write a message inside the card. "My heart is yours to hold" is one idea that refers to the front design. Read more...
Tuesday, February 10, 2009


Valentine's Day Card Album
| |||||
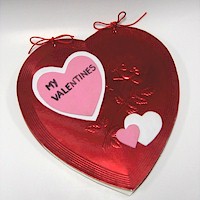 Don't throw out your Valentine's Day candy box. Turn it into an album to hold your cards and even photos of your friends and family. Supplies Heart Shaped Candy Box Large Paper Pink and White Craft Foam or Card Stock Markers Hole Punch Scissors Tacky Glue Cord or Ribbon Click here for printables Instructions Cut the bottom and the top off a candy box. Discard sides. Trace around the top on large paper. Cut out. Punch holes in all the top edges. Line up pages. String together using ribbon or cord. Paste your cards inside. Cut our foamie hearts. Glue to top. Write your name and the year in a large heart.
| |||||

Read more...
Thursday, February 5, 2009
Festive Wreath

These all-recycled wreaths are great for hanging on the door to greet your visitors.
For one wreath you will need:
Cardboard (pizza box tops work great)
A dinner plate and a slightly smaller round stencil
Pen or pencil
Box cutter
Mod Podge or other craft glue
Decorative paper scraps (leftover wrapping paper, tissue paper or florist paper)
Paintbrush
Assorted greeting cards
1) Use the plate to stencil a circle onto the cardboard. Center a smaller stencil inside the first circle, and trace around it with a pen or pencil. Cut out the circles with a box cutter to make a cardboard ring.
2) Cut the scrap paper into 1 inch squares. Using the paintbrush, spread a bit of mod podge onto the cardboard ring. Place a square of paper over the glue, then brush with a thin layer of mod podge to smooth.
3) Continue adding squares of paper until the entire ring is covered, over lapping each square slightly. Add 2 or more layers until the cardboard no longer shows through. Allow each layer to dry before adding the next one.
4) Cut assorted festive shapes from the greeting cards. Arrange the pieces on the wreath until you are satisfied with the design. Apply the card shapes to the wreath with mod podge, and allow to dry.
5) Decorate the wreath with glitter if you wish, and hang from a door or window with a push pin.
You can also attach a string to the wreath for easy hanging. Simply staple a length of string to the back of the cardboard ring before adding the paper squares. Cover the staples with paper as you work to secure them.

![]()
Read more...
Wednesday, February 4, 2009
Tuesday, February 3, 2009
Party Hats
Cone Hats
When my son was born, we planned a birth party for him. Actually the party was an activity to keep my older daughter happy and busy. At the last minute she realized we didn't have hats for the party. We made simple cone hats and decorated them. My son is now two, and she still thinks these are the best party hats we've ever had.
MaterialsPaper (12"x18 is best)
|  |
|

- You may want to experiment using newspaper to get the shape right.
- Use whatever craft material you have on hand for the children to decorate the party hats.
- While the party hats are drying, put a line of white glue down one side of the triangle. Then rolled it into a cone shape. Use a paper clip on the top and bottom to hold it together until the glue dries.
Simple Paper Hats
This party hat may not last as long, but is much easier to fit.
|

- Have the child decorate one side with craft materials, and let dry.
- To fit the party hat to the child's head, use the rectangle as a headband. Measure for size, then tape, glue or staple the hat.
- The triangle is the front of the hat, with the band running around the child's head.
Ideas for Decorating
|
These hats are larger than the traditional birthday hats that need elastic to stay on. You can add ribbon or string to tie the party hats on if the kids want ties on their hats.
Sombrero Hats
Materials
2 sheets of newsprint for each hat
Masking tape
Decorations (see ideas below)
- Use at least two sheets of large newsprint at least 3' on each side.
- Place the sheets at different angles (should look like an 8 point star).
- Center it over the person's head, and hold scrunch it down to make a head shaped dome in the center.
- Wind masking tape around the bottom of the dome (app. ear level).
- Scrunch and roll the sides in to finish the sombrero shape.
- Decorate the sombreros using what ever materials you have on hand.
Ideas for Decorations
- Paint or spray paint the paper before it is made, or after the hat is shaped.
- Make a ribbon or paper band to cover the masking tape.
- Make a fringe out of paper, fabric, or ribbon to go around the bring.
- Use glitter glue to draw designs on the paper.
- Glue on yarn, ribbon, pom poms, fancy buttons, sequins, or whatever you have on hand.
- Use markers or crayons to draw designs on the hats.
- Cut out shapes from the left over paper and glue on.
- Make it into an Easter Bonnet by gluing on some silk flowers from an old arrangement or 2nd hand store.
- Let the kids come up with more ideas.
Paper Hats
Follow the idea for Sombrero Hats but create different shapes.
- Push a bit more paper up in the center before winding the masking tape. Use scissors to cut the brim to create a Top Hat shape.
- Similar to a Top Hat, you could make a Stetson Hat. After cutting the brim, use gently pressure to create the crease in the center of the top. Use glue or tape to bring up the sides of the brim.
If you don't want to paint your party hat, use colored tissue paper to create your hat.
Read more...
Sunday, February 1, 2009
Subscribe to:
Posts (Atom)