• Home
  • Tags
  • RSS
  • ME!
  • Edit

Saturday, February 12, 2011

Valentine Sucker Tutorial


First, collect your supplies:

(everything can be found at Michaels, of course!)

~cut 2 heart shapes out of felt
~embroidery floss
~oversized needle (these work better than regular handsewing needles)
~wooden stick
~polyester filling
~hot glue gun
~Valentine ribbon
~plastic sucker bag (optional)


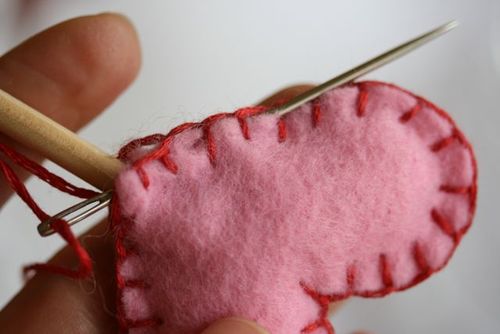
Beginning close to the point of the heart, blanket stitch the two hearts together. (Leave a gap at the point that is large enough to place the wooden stick in)


Leave yourself enough room (about 1") to stuff polyester filling inside the heart.


Using your hot glue gun, glue a small amount of glue on the end of the wooden stick.


Place stick 1/2" inside the heart, making sure you do not glue the "points" of the hearts.


Finish stitching around the heart. (When stitching the point, you will stitch one side of the heart at a time)


As shown in the Cookie Tutorial, work the needle back and forth a few times to hide the leftover thread.


Read more...

Rose Stencil Valentine's Day Mug


Here's an inexpensive Valentine's Day gift that you can make yourself for that special someone. We provide the free, full-sized rose stencil pattern (at right) - or you could use your own romantic theme. Either way, a mug that you paint yourself is sure to please!


Rose Stencil Valentine's Day Mug

Materials List:

white coffee mug
printed rose stencil pattern (shown above, right)
Perm enamel surface conditioner
Perm enamel paints (your choice of colors)
Perm enamel gloss
sharp nail scissors or Exacto knife

rose (1K) Stencil a Valentine's Day Coffee Mug
Instructions:

Purchase an inexpensive glass coffee mug or use a solid white one that you may already have around. Clean the mug well with dishwashing liquid and water, then rinse and dry thoroughly.

With a paint brush, brush on the surface conditioner. You must let this dry, but you can usually paint on your design within an hour.

You can purchace stencil paper that is specifically manufactured for making your own stencils, but why not save the money and use plain paper and tape? Print out the pattern, put wide tape on both sides of the paper pattern, then cut out using sharp cuticle scissors or an exacto craft knife.

Put the stencil in position on the mug (not too close to the top) and keep it in place with spray stencil glue, or tape it firmly in place.

Use a makeup sponge to sponge the paint colors on the stencil. You will need two coats of paint. Make another stencil on the other side of the mug handle so that you have a picture on both sides of the mug. If you wish, try painting some small hearts at the bottom as a border, as well as down the stem of the handle.

Let dry overnight.

Paint on the perm enamel gloss with a brush, and let cure for ten days before washing. (Hint, I set mine in the oven at 225 degrees, when it was dry, for a couple of hours. The paint was fine and I was able to skip the 10 day waiting period.)

Caution:

Check the manufacturers instructions when applying paint, particularly if you are using paint on an object that will be used for serving food or drinks. Most paints should not be applied close to the lip of a cup, for instance - so please make sure you read the bottle label carefully.


Read more...