• Home
  • Tags
  • RSS
  • ME!
  • Edit
Showing posts with label love. Show all posts

Saturday, February 12, 2011

Valentine Sucker Tutorial


First, collect your supplies:

(everything can be found at Michaels, of course!)

~cut 2 heart shapes out of felt
~embroidery floss
~oversized needle (these work better than regular handsewing needles)
~wooden stick
~polyester filling
~hot glue gun
~Valentine ribbon
~plastic sucker bag (optional)


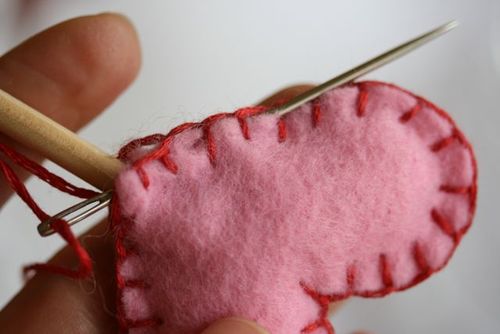
Beginning close to the point of the heart, blanket stitch the two hearts together. (Leave a gap at the point that is large enough to place the wooden stick in)


Leave yourself enough room (about 1") to stuff polyester filling inside the heart.


Using your hot glue gun, glue a small amount of glue on the end of the wooden stick.


Place stick 1/2" inside the heart, making sure you do not glue the "points" of the hearts.


Finish stitching around the heart. (When stitching the point, you will stitch one side of the heart at a time)


As shown in the Cookie Tutorial, work the needle back and forth a few times to hide the leftover thread.


Read more...

Friday, January 16, 2009

Valentine Cards - Love You

Supplies you'll need:
  • 1 piece 8-1/2" by 11" card stock, white
  • scrap piece of red cardstock for heart punchie
  • 2 red or metallic mini brads
  • glue stick
  • one piece printed vellum
Tools you'll need:
  • word processor(ex: MS Word)
  • paper cutter and scissors
  • small hole punch & one inch heart punch
  • Free Adorable Font
Begin by downloading and installing the Adorable font.
In your word processor:
  1. You need to set your page to landscape, which means the paper is held horizontally. For MS Word 2000: File -> Page Setup -> Paper Size ->Landscape.
  2. Format the page so it has two columns. For MS Word 2000: Format -> Columns -> Two.
  3. Set the bottom margin to 7". Just slide the margins on the left.
  4. In the first column, set the font to size: 72; color: dark red, Adorable font, Type: 'Be Mine'.
  5. Copy this column and paste it in the second column.
  6. Check the print page set up and make sure the text is in the bottom center in its column, if so, print out. If not, go back and fix, then print out.
  7. When you have printed this out, cut the 8-1/2" by 11" sheet in half. This will be your two cards.
  8. Cut the vellum so that it fits above the 'Love You' on the card.
  9. Line up the piece of vellum on your card front and hold it there while you punch a small hole on either side at the top. Attach your mini brads.
  10. Punch out a heart and attach to the card at the bottom, overlapping the vellum. Use glue and attach the vellum to the card under the punchie. This is so that you hide the glue mark that will show through the vellum.

    Be sure that the vellum is secure under the punchie and at the top where the mini brads are located. After the glue is dry, send it to someone you love.


Read more...