


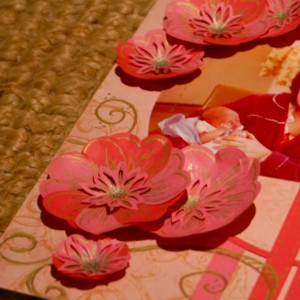
There are so many lovely ways to do this. One way is to use your heart punches. You can make flat flowers or 3-d ones very easily. Let me show you how!
To make flat flowers, you will need:
- A heart punch – use several different sizes of heart punchess if you want to make a few different sized flowers
- Some cardstock or designer patterned paper
- Some adhesive such as a glue pen or a double sided tape runner
- Perhaps a circle punch for the centre, or you could use a brad, another shaped punch, or anything else that you think would make the centre of the flowers pretty
- Scissors with a sharp point are often very useful, but sometimes not really necessary – the punch can do all of the cutting for you
- Pens or paints or other markers for adding a little depth to your blossoms with a few lines or accents. I use a lot of metallic pens for this, like gold, copper or silver or even all three with a little black to add more depth

Here’s How to Make Paper Flowers like the ones in my illustration above, only flat:
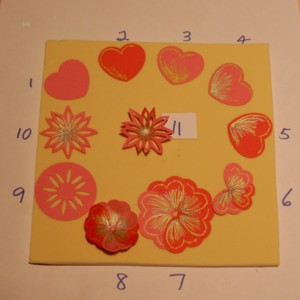
- Step 1 - decide what size heart punch you want to use. It will be forming the petals. Punch out about seven hearts. You may need more or less, depending on the punch size and how much you want to overlap the hearts
- Steps 2 to 5 - Now use your markers or pens to make the centres seem more like blooms. I colour the point of my hearts as they will form the centres of the blossoms. I also run a little edge over the outside of the heart as shown in steps two and three
- Step 6 to 7 – Assemble your hearts together as shown, continuing until you have enough to make a flower. Put some adhesive behind each petal so it will stick to the last one. When you reach the last petal, slip it under the first and adhere it down
- Step 8 – Shape your flower with the shaping tool (this process is described below)
- Step 9 – punch out the centre of your flower. I used two punches here, a flower punch and a circle punch. If you use a flower punch like this where the petals are a silhouette, punch the flower first then punch out around it with your circle punch. If you try it the other way round, the circle will slip around in the flower punch and it be hard to get an even border
- Step 10 – With this centre decoration, I added accents to it with gold, silver and black pens then trimmed around the image with my sharp little scissors
- Step 11 – The shaped centre
For one finished effect, you can now use the flat shapes as they are. Just place the centre piece in the middle and glue it down. This is great for scrapbook albums where you don’t want too much bulk.


0 comments:
Post a Comment
Please leave your comment here ^)^