• Home
  • Tags
  • RSS
  • ME!
  • Edit
Showing posts with label pillow. Show all posts

Thursday, July 7, 2011

Making Simple Cushions Instructions

These are the easiest cushions to make even if you have limited sewing skills.
Simple cushions can be made in all weights of fabric from lightweight cottons to heavyweight velvets.


They can be made to match, contrast or coordinate with your soft furnishings, be left plain or enhanced by adding lace, braid or fringing.
The instructions below are for a simple square cushion which can be used to complement a sofa, add a finishing touch to a chair or enhance the look of a bed.

Image refers to the colour code key for the diagrams
Requirements:
Square cushion pad in the desired size.
Fabric of your choice.
Braid, lace or fringing, if required, enough for the circumference of the cushion pad.
Matching thread.
Refers to step 5 of making a simple cushion
Making a Simple Square Cushion:
Refers to steps 3 and 4 of making a simple cushion


Measure the cushion pad, place the tape measure seam to seam and add a seam allowance of 0.5" (12 mm) to all edges.
Cut out 2 pieces of fabric to the chosen size including the seam allowance.
Place the 2 pieces of fabric with right sides together. Pin and stitch around the 4 corners and 3 sides, leaving an opening in the centre of the remaining side big enough to insert the cushion pad. Fasten the ends of the threads securely.
Turn the cover right side out and insert the cushion pad.
Turn under the raw edges of the opening in line with the remainder of the seam and slipstitch.
If required, stitch braid, lace or fringing to the right side using a small backstitch.


Read more...

Sunday, April 5, 2009

Heart Appliqué Pillow


Supplies:

Fabric of Choice (amount will vary depending on pillow size)

Pillow Form

Fabric scraps of choice

Gathered Lace Trim (amount will vary depending on pillow size)

16 Buttons

Fusible Web

Embroidery Thread

Needle and thread to match fabric

How to:

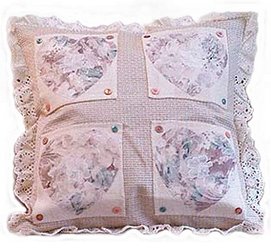
This pillow is made to fit a 20 inch pillow form, but these can be made in any size you like. You will need three different fabrics. One for the pillow base, one for the squares and one for the hearts. I used fabric samples for this entire pillow cover. Check your local fabric and decorating shops for sample pieces; they are usually very affordable.

I used two different fabrics for the front and back of the pillow. Only because my sample pieces were not large enough to make both sides the same. Cut one 21 inch square piece for the front and another for the back.

Cut four squares to a suitable size [plus one inch] from your second fabric and cut four heart shapes from your third fabric. Refer to photo as a reference for size and placement.

With right side facing down, turn over a one half inch seam to all sides of the four small square pieces and press with an iron to hold. Using double sided fusible web, attach one side of web to each of the four squares and each of the four heart shapes (follow manufacturer instructions for application of fusible web).

Peel the backing off of each square and iron in place to the front piece of your pillow. On top of the squares, iron your heart shapes in place. Sew in place one button to each corner of the four squares using embroidery thread.

Hand stitch, using embroidery thread around each heart shape. This stitching can be uneven and either a simple slip stitch or blanket stitch can be used. This stitching is not only is decorative, but insures that if the fusible web ever loosens, the pieces will remain in place.

Attach your lace trim by stitching your lace to the right side edge of your front piece of fabric (right sides together with lace outer edge, facing toward the center of the pillow). Use a large stitch or basting stitch as this will be held more secure with later stitches. Pin right sides together of the front and back piece, making sure that your lace trim will not interfere with your stitches and sew around all four sides of the pillow cover, leaving an opening large enough to turn the pillow right side out. Depending on the weight of the fabric you use, the opening may require a fairly large space.

Once you have sewn the front and back together, clip the four corners to allow for cleaner corners once turned right side out. Turn your pillow cover right side out, insert pillow form and hand [or machine] stitch the opening closed.
Read more...

Thursday, March 26, 2009

6 steps for a pillow

Image:Applique flying tree pillow.jpg

When many people think of sewing things, they often believe that they need a pattern. However, when you are sewing a basic pillow, there is no need for one (because it is extremely simple). This article will show you how to make a basic square or rectangular pillow.

test

Steps

  1. Decide how big your pillow is going to be. If you are going to use stuffing, it can be any size you want. But for our project the dimensions will be ______inches square.
  2. After double checking on the measurements, add a half inch to each side to allow for a quarter-inch seam on all four sides. This means you will add 1 inch to the size of the pillow.
  3. Mark your measurements, and then cut the fabric to size.
  4. Put the right sides of the fabric together. Pin the fabric together around the edges with pins pointing to the center.
  5. Sew around the edges with a half-inch (width of the presser foot) seam allowance, leave your opening in the middle of one side. Leaving a large enough opening to insert stuffing. To reinforce the seams, zig zag around the edges, especially if you are sewing smaller seams.
  6. Turn your fabric right-side out and insert stuffing. Turn the edges of the opening under slightly and sew it together using a whip-stitch. Make sure that the thread matches the fabric so it blends in and is not seen. You now have a beautiful pillow.
Tips:

  • Measure twice, cut once!
  • Cotton fabric is best if you are a beginner.
  • Look online and in sewing books for ideas on how to use ribbon, buttons, and piping in your pillows.
2008-05-21-Onesie Pillow2

BunnyPillow.jpg


Read more...

Thursday, February 26, 2009

Pillows

Ingredients

1. Fabric (Cat paw print, Approx. 1.5m)
2. Wool (Red, black, cream)
3. Wool needles
4. Pillows X 2
5. Buttons - Different sizes (Yellow and blue)
6. 1 Large button (Blue)
7. Felt (Dark pink, baby blue and cream)
8. Denim Fabric (Approx. 0.5m)
9. Chalk(White)

Method

1. Measure fabric to pillows and cut two squares of fabric to cover them.
2. Place the 2 pieces of fabric together right sides together. Sew closely around the edge in yellow or blue wool and leave one side open so pillow can slide in. Sew a large button on the opening side so it's easy to open and close.
3. Cut a square of denim approximately 22cm square.
4. Draw a picture of a cat's face on the denim. Following the design of the cat face, sew on some yellow buttons with red wool, see example.
5. Sew on two blue buttons on the denim, with the red wool, to make the cat's eyes.
6. With black wool sew on whiskers and cut out a nose and tongue from the pink felt. Sew them on the denim with red wool.
7. After you've finished the face sew the square onto the base fabric with cream coloured wool.
8. Then add 2 small paw prints for a boarder, made from pink and cream felt, sewn with black and red wool.
9. Put the pillow case over the pillow and fasten the button on the open side.
10. Repeat the steps using a dog face design to make a button pillow dog portrait.
Read more...