• Home
  • Tags
  • RSS
  • ME!
  • Edit
Showing posts with label valentine. Show all posts

Saturday, February 12, 2011

Valentine Sucker Tutorial


First, collect your supplies:

(everything can be found at Michaels, of course!)

~cut 2 heart shapes out of felt
~embroidery floss
~oversized needle (these work better than regular handsewing needles)
~wooden stick
~polyester filling
~hot glue gun
~Valentine ribbon
~plastic sucker bag (optional)


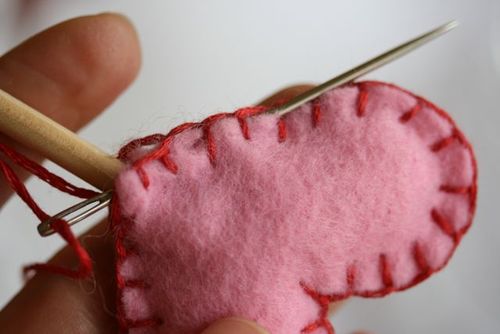
Beginning close to the point of the heart, blanket stitch the two hearts together. (Leave a gap at the point that is large enough to place the wooden stick in)


Leave yourself enough room (about 1") to stuff polyester filling inside the heart.


Using your hot glue gun, glue a small amount of glue on the end of the wooden stick.


Place stick 1/2" inside the heart, making sure you do not glue the "points" of the hearts.


Finish stitching around the heart. (When stitching the point, you will stitch one side of the heart at a time)


As shown in the Cookie Tutorial, work the needle back and forth a few times to hide the leftover thread.


Read more...

Rose Stencil Valentine's Day Mug


Here's an inexpensive Valentine's Day gift that you can make yourself for that special someone. We provide the free, full-sized rose stencil pattern (at right) - or you could use your own romantic theme. Either way, a mug that you paint yourself is sure to please!


Rose Stencil Valentine's Day Mug

Materials List:

white coffee mug
printed rose stencil pattern (shown above, right)
Perm enamel surface conditioner
Perm enamel paints (your choice of colors)
Perm enamel gloss
sharp nail scissors or Exacto knife

rose (1K) Stencil a Valentine's Day Coffee Mug
Instructions:

Purchase an inexpensive glass coffee mug or use a solid white one that you may already have around. Clean the mug well with dishwashing liquid and water, then rinse and dry thoroughly.

With a paint brush, brush on the surface conditioner. You must let this dry, but you can usually paint on your design within an hour.

You can purchace stencil paper that is specifically manufactured for making your own stencils, but why not save the money and use plain paper and tape? Print out the pattern, put wide tape on both sides of the paper pattern, then cut out using sharp cuticle scissors or an exacto craft knife.

Put the stencil in position on the mug (not too close to the top) and keep it in place with spray stencil glue, or tape it firmly in place.

Use a makeup sponge to sponge the paint colors on the stencil. You will need two coats of paint. Make another stencil on the other side of the mug handle so that you have a picture on both sides of the mug. If you wish, try painting some small hearts at the bottom as a border, as well as down the stem of the handle.

Let dry overnight.

Paint on the perm enamel gloss with a brush, and let cure for ten days before washing. (Hint, I set mine in the oven at 225 degrees, when it was dry, for a couple of hours. The paint was fine and I was able to skip the 10 day waiting period.)

Caution:

Check the manufacturers instructions when applying paint, particularly if you are using paint on an object that will be used for serving food or drinks. Most paints should not be applied close to the lip of a cup, for instance - so please make sure you read the bottle label carefully.


Read more...

Tuesday, February 17, 2009

Valentine's Day Card

http://crafts.kaboose.com/swf/350x255_Three-Peas-in-a-Pod_rdax_65.jpg

What you'll need:

  • Design cardstock
  • Dark green embroidery thread
  • Green felt
  • Lime green felt
  • Wooden beads small
  • Needle
  • 1/4"x 5"green ribbon
  • Glue gun
  • Colored paper (2 colors)
  • Thin wire 2"
  • Pencil/ Ruler
  • Glue stick
  • Scissors
  • Pattern

How to make it:

Step 1: Card Pattern

  1. Trace and cut card pattern with design cardstock.
  2. Trace and cut heart pattern with color paper.
  3. Trace and cut pea pod pattern with green felt.
  4. Trace and cut pea pod tip pattern with lime green felt.
  5. Cut out (2) small hearts with color paper. (We used pea green.)
  6. Curl two small pieces of thin wire. (Twist them around a pencil to get even curls.)

Step 2: Pea Pod

  1. Stitch along edge of pod with green embroidery thread
  2. Glue two small wooden beads in the center of pod
  3. Fold edges together
  4. Place a dab of glue on the inside ends of pod and pinch sides together
  5. Wrap lime green pea pod tip around top end of pod
  6. Glue tip in place

Step 3: Finishing Touches

  1. On the card, use green embroidery thread to stitch around the inside of the edge of heart cut out.
  2. Wrap the pea pod tip piece around the pea pod and glue in place. Then glue the whole pea pod to the front top center of cut out heart.
  3. Glue curled wire to the tip of pod.
  4. Tie a small bow with the 1/4" ribbon.
  5. Glue bow on front top center of cut out heart, over the very tip of the pea pod and the wire.
  6. Glue the paper heart cut out on the inside center of card with glue stick. Make sure the pea pod, wire, and ribbon show through the cut out heart shape of the card.
  7. Glue 2 small hearts on top of the cut out paper heart with glue stick. We placed ours on either side of the pea pod.

Tips:

  • You can replace felt pea pod with a paper cut out.
  • Needles and wire have sharp ends. If little ones are completing this craft, have an adult do the steps involving the sewing and wire.

Read more...

Heart-in-Hand Valentine Card

Things You’ll Need:

  • Brushes
  • Crayons
  • Fabrics
  • Glues
  • Paints
  • Foil-wrapped Candy Hearts
  • Heart-shaped Cookie Cutters
  • Scissors
  • Scissors
  • Card Stock
  • Construction Paper
  • Markers
  • Pencils And Erasers
  • Crayons
  • Markers
Instructions
Step1
Fold a piece of construction paper or card stock into whatever size you would like the card to be. Make sure it will be large enough to fit an entire hand on its cover.
Step2
Trace your hand or a child's hand on the front of the card using a pencil. Make sure you center the hand while tracing. Be careful that the hand does not move during tracing.
Step3
Look at the hand after you trace it and be sure it is a shape you like. Make any corrections, such as straightening any wobbly lines.
Step4
Extend the hand to the bottom of the card or draw a line closing it off at the wrist.
Step5
Draw or trace a small heart in the center of the palm area of the hand using a pencil. A small, heart cookie cutter will provide an easy heart template.
Step6
Go over the hand and heart outlines with marker, crayon or paint. Erase any pencil lines that can be seen.
Step7
Paint or color-in the heart and hand. For the best contrast, use different colors for the heart and hand. Add fingernails to the hand if you like.
Step8
Decorate the rest of the card with complementary colors and designs.
Step9
Write a message inside the card. "My heart is yours to hold" is one idea that refers to the front design.

Read more...

Tuesday, February 10, 2009

Valentine's Day Card Album


Don't throw out your Valentine's Day candy box. Turn it into an album to hold your cards and even photos of your friends and family.


Supplies

Heart Shaped Candy Box

Large Paper

Pink and White Craft Foam or Card Stock

Markers

Hole Punch

Scissors

Tacky Glue

Cord or Ribbon


Click here for printables

Instructions

Cut the bottom and the top off a candy box. Discard sides. Trace around the top on large paper. Cut out. Punch holes in all the top edges. Line up pages. String together using ribbon or cord. Paste your cards inside. Cut our foamie hearts. Glue to top. Write your name and the year in a large heart.


Read more...

Friday, January 16, 2009

Valentine Cards - Love You

Supplies you'll need:
  • 1 piece 8-1/2" by 11" card stock, white
  • scrap piece of red cardstock for heart punchie
  • 2 red or metallic mini brads
  • glue stick
  • one piece printed vellum
Tools you'll need:
  • word processor(ex: MS Word)
  • paper cutter and scissors
  • small hole punch & one inch heart punch
  • Free Adorable Font
Begin by downloading and installing the Adorable font.
In your word processor:
  1. You need to set your page to landscape, which means the paper is held horizontally. For MS Word 2000: File -> Page Setup -> Paper Size ->Landscape.
  2. Format the page so it has two columns. For MS Word 2000: Format -> Columns -> Two.
  3. Set the bottom margin to 7". Just slide the margins on the left.
  4. In the first column, set the font to size: 72; color: dark red, Adorable font, Type: 'Be Mine'.
  5. Copy this column and paste it in the second column.
  6. Check the print page set up and make sure the text is in the bottom center in its column, if so, print out. If not, go back and fix, then print out.
  7. When you have printed this out, cut the 8-1/2" by 11" sheet in half. This will be your two cards.
  8. Cut the vellum so that it fits above the 'Love You' on the card.
  9. Line up the piece of vellum on your card front and hold it there while you punch a small hole on either side at the top. Attach your mini brads.
  10. Punch out a heart and attach to the card at the bottom, overlapping the vellum. Use glue and attach the vellum to the card under the punchie. This is so that you hide the glue mark that will show through the vellum.

    Be sure that the vellum is secure under the punchie and at the top where the mini brads are located. After the glue is dry, send it to someone you love.


Read more...

School Valentine Card

What you'll need:
  • Red cardstock cut to 3 ½” x 3 1/2”
  • Craft scissors with a scalloped or zig-zag edge (optional)
  • Scissors
  • Scraps of patterned paper, about 2” long and 1/2” wide
  • Scrap of patterned paper 2” square
  • Hole punch
  • Marker
  • Adhesive such as double sided sticky tape, glue stick, liquid glue or mini glue dots
  • Rick-rack, ribbon or yarn about 8” long (optional)
  • Candy (optional)

How to make it:

  1. Use the craft scissors to trim the edges of the red cardstock. (Skip this step if you wish).
  2. Use your scissors to freehand cut a circle from the 2” square of paper. It doesn't have to be perfectly round.
  3. Use the hole punch to punch a hole in the circle. It doesn't have to be exactly in the middle; in fact, it looks better when it's off center!
  4. Glue the 2” strips of paper on the red cardstock, forming an X.
  5. Glue the circle beside it.
  6. Help your child write “To” and “From” on the back of the Valentine.
  7. If you wish, use the hole punch to punch a hole in the top left corner of the valentine, and thread the rick-rack through it. Tie a Valentine treat, like a candy necklace or lollipop, to it.

Tips:

  • If an “XO” card is too “mushy” for your child, omit and use the paper strips to make an “F” (just cut one of the strips in half). Then your child can write “Friend” on the card.
  • This Valentine is a great way to use up small scraps of patterned paper. Have fun trying out different combinations.
  • If your child and his friends are into a particular cartoon character or sports team, keep an eye out for stationery or other paper that features the appropriate pictures and logos to make the “XO.” Or, you could use plain paper decorated with small stickers from the dollar store.
  • Craft stores sell large punches that allow you to punch out circles ½” or more in diameter.
  • Craft scissors with a scalloped or zig-zag edge are inexpensive and widely available at craft stores. Craft stores also sell small punches (for the center of the “O”) in a variety of shapes, including hearts, stars and spirals.

Quick switch This card could easily be used as a tag on a gift like a box of cookies or chocolates. Or, for a larger card, just glue the “XO” onto a piece of cardstock cut to 5 ½” x 8 ½”. It would make a great anniversary card too.


Read more...

Foam Roses

What you'll need:
  • 1 ½ green chenille stems (per flower)
  • Red craft foam
  • Scissors
  • White craft glue or hot glue gun

How to make it:

  1. Set aside the ½ chenille stem for a later step. Take the full chenille stem and bend it in half. Starting at the bent end, twist the chenille stem around itself all the way up. When you reach the end trim it to make it even if needed.
  2. Cut out 1” tear drop shapes from the red foam, you will need 7 of these.
  3. Cut out ¾” tear drop shapes from the red foam, you will need 3 of these.
  4. Lay a 1” tear drop on the table, point side down. Glue the open end of the twisted chenille stem to the red tear drop petal.
  5. Glue a second tear drop behind the first tear drop (point side down), most of the tear drop in back will be visible. Repeat on the other side. Repeat again on each side, gluing them in a curved fashion (similar to a half circle). When you are done there should be one petal in the middle and 3 on each side.
  6. Glue one of the smaller tear drop petals on top of the green chenille stem. Glue the other two smaller petals overlapping the first one, point side down.
  7. Once these are all dry, bend and curve the foam petals to join both rounded sides together to form the flower. Glue in place and hold until dry, hot glue comes in handy here.
  8. Use the ½ chenille stem to bend the leaves into shape and twist around the stem.

Tips:

  • Craft foam can be purchased in precut shapes or in sheets.
  • If using a hot glue gun, be sure to get a low temp one and follow the instructions carefully.
  • Make a bouquet of these roses and place in a decorated baby food jar!

Read more...

Puffy Heart

What you'll need:
  • Pink and white tissue paper, cut into 1” squares
  • White craft glue
  • Scissors
  • Piece of card stock or construction paper
  • Pencil with an eraser

How to make it:

  1. Cut out a heart shape from the construction paper or card stock.
  2. Put white craft glue into the center of the heart, shaped like a heart.
  3. Using the eraser end of a pencil, place the eraser into the center of a white tissue paper square. Twist the tissue paper square around the eraser and dot it onto the glue. Continue this process until entire middle of the heart is covered with white tissue paper. See photo.
  4. Repeat the process from step #3 with pink tissue paper for the border of the heart.
  5. Glue a hanger to the back if you like.

Tips:

  • For younger kids who have trouble working the pencil steps, allow them to wad up the tissue paper squares and press them directly onto the glue with their fingers.
  • Instead of a hanger, try gluing a magnet strip to the back and hang on your fridge!
  • Always saved the tissue paper from birthday gifts for craft projects like these.

Read more...

Valentine Photo Frame

What you'll need:
  • Acrylic paint: dark pink, pink, peach, purple
  • Acrylic gesso (optional) (recommended: Liquitex Basics Gesso)
  • Paintbrush
  • Wooden photo frame
  • Craft jewels
  • Glue (recommended: white craft glue or Gem-Tac brand glue)
  • Acrylic sealer spray

How to make it:

  1. Paint the frame with a coat of gesso. (See image.) Gesso is a craft medium that helps provide a good surface for paint to grab. You can skip this step and paint with white paint. Allow to dry.
  2. Paint the frame in four sections, each section being a different color (purple, pink, dark pink, peach). (See image.)
  3. When paint is dry, spray frame with acrylic sealer and allow to dry for about an hour.
  4. Use glue to decorate the frame with craft jewels. We used some sticker craft jewels and some that needed to be glued on.

Tips:

  • You can buy large variety packs of craft jewels that contains all different sizes, shapes and colors to be used in a variety of projects.
  • You can use white craft paint in place of Gesso as a medium.
  • Some craft jewels are self stick, just peel them off their backing and stick to your project!

Read more...