


 Supplies:
Fabric of Choice (amount will vary depending on pillow size)
Pillow Form
Fabric scraps of choice
Gathered Lace Trim (amount will vary depending on pillow size)
16 Buttons
Fusible Web
Embroidery Thread
Needle and thread to match fabric
How to:
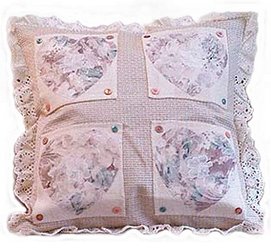
This pillow is made to fit a 20 inch pillow form, but these can be made in any size you like. You will need three different fabrics. One for the pillow base, one for the squares and one for the hearts. I used fabric samples for this entire pillow cover. Check your local fabric and decorating shops for sample pieces; they are usually very affordable.
I used two different fabrics for the front and back of the pillow. Only because my sample pieces were not large enough to make both sides the same. Cut one 21 inch square piece for the front and another for the back.
Cut four squares to a suitable size [plus one inch] from your second fabric and cut four heart shapes from your third fabric. Refer to photo as a reference for size and placement.
With right side facing down, turn over a one half inch seam to all sides of the four small square pieces and press with an iron to hold. Using double sided fusible web, attach one side of web to each of the four squares and each of the four heart shapes (follow manufacturer instructions for application of fusible web).
Peel the backing off of each square and iron in place to the front piece of your pillow. On top of the squares, iron your heart shapes in place. Sew in place one button to each corner of the four squares using embroidery thread.
Hand stitch, using embroidery thread around each heart shape. This stitching can be uneven and either a simple slip stitch or blanket stitch can be used. This stitching is not only is decorative, but insures that if the fusible web ever loosens, the pieces will remain in place.
Attach your lace trim by stitching your lace to the right side edge of your front piece of fabric (right sides together with lace outer edge, facing toward the center of the pillow). Use a large stitch or basting stitch as this will be held more secure with later stitches. Pin right sides together of the front and back piece, making sure that your lace trim will not interfere with your stitches and sew around all four sides of the pillow cover, leaving an opening large enough to turn the pillow right side out. Depending on the weight of the fabric you use, the opening may require a fairly large space.
Once you have sewn the front and back together, clip the four corners to allow for cleaner corners once turned right side out. Turn your pillow cover right side out, insert pillow form and hand [or machine] stitch the opening closed.
Sunday, April 5, 2009
Heart Appliqué Pillow

Subscribe to:
Post Comments (Atom)


0 comments:
Post a Comment
Please leave your comment here ^)^