Tuesday, September 14, 2010
Candy Bar Gift Wrap
Dress up your Christmas candy bars and chocolate barks with this elegant idea.
Materials
* Aluminum foil
* Scissors
* Wrapping paper
* Double-sided tape
* Ribbon
Instructions
1.Carefully wrap each bar with aluminum foil, making sure it stays as smooth as possible. Next, measure the length and width of the bar. Cut a piece of festive wrapping paper so that it's 1/2 inch shorter than the bar and wraps around the width with 1/2 inch of overlap.
2. Wrap the paper around the foil and secure it in place with double-sided tape. Decorate with a ribbon or personalize it with a family photo or a drawing from your child.
Read more...
3D Paper Stars
Have you ever seen little paper stars like these? They're very easy to make, and they're a fun way to recycle a bit of junk mail into something colorful and decorative.
Steps
1.
A long, narrow strip.
Cut a long, narrow strip of paper about 1 cm wide and as long as whatever page you are cutting.
2.
A simple knot.
Tie a simple knot (the same kind you use to tie your shoes) at one end. Cross the ends of the strips and pull one end through the loop that forms. If you want the color from a particular end of the strip, tie the knot at the other end. Don't twist the paper, just loop it around.
3.
Gently pull the knot without creasing or squeezing the strip of paper. When all the edges are in contact press it down and crease. You should have a pentagon with a long end and a short end sticking out.
4.
Fold the short end over, following the edges of the pentagon, so that it does not stick out. If there's a little more than a pentagon width, you can tear it off or fold it under and tuck it in.
5.
Wrap the long end around and around the pentagon, following the edges and the folds. The result should be a fatter pentagon. Fold so that the color you want faces out, if the two sides of the strip are different.
6.
Tuck in the loose end. If there is a little too much, fold it over or tear it off before tucking it in.
7.
Pinch the corners to make the pentagon into a star.
Read more...
Make your own kite
Have ever wanted to build a kite? Well, here is a simple kite you can make your self!
A kite consists of these basic parts:
# The Spine. The up-and-down, or vertical stick that you build your kite around.
# The Spar. The support stick(s), that are placed crossways or at a slant over the spine. Sometimes they are curved or bowed.
# The Frame. The joined spine and spars, usually with a string connecting their ends, that form the shape of the kite and make a support for the cover.
# The Cover. The paper, plastic, or cloth, that cover the frame to make a kite.
# The Bridle. One or more strings attached to the spine or spars, which help control the kite in the air.
# The Flying Line. The string running from the kites’ bridle, where you hold to fly the kite.
# The Tail. A long strip of paper or plastic of ribbon that helps to balance the kite in flight. Not all kites need tails.
# The Reel. The object you use to wind your flying line, to keep it form getting tangled or flying away.
DIAMOND KITE
Materials:
# butcher cord or thin garden twine
# scotch tape or glue
# 1 sheet of strong paper (102cm x 102cm)
# 2 strong, straight wooden sticks of bamboo or wooden doweling 90cm and 102cm
# markers, paint or crayons to decorate you kite.
1. Make a cross with the two sticks, with the shorter stick placed horizontally across the longer stick. Make sure that both sides of the cross piece is equal in width.
2. Tie the two sticks together with the string in such a way as to make sure that they are at right angles to each other. A good way to ensure that the joint is strong to put a dab of glue to stick it in place.
3. Cut a notch at each end of both sticks. Make it deep enough for the type of string you are using to fit in to. Cut a piece of string long enough to stretch all around the kite frame. Make a loop in the top notch and fasten it by wrapping the string around the stick. Stretch the string through the notch at one end of the cross-piece, and make another loop at the bottom. Stretch the string through the notch at one end of the loop at the bottom. Stretch the string through the notch at the other end of the cross-piece. Finish by wrapping the string a few times around the top of the stick and cutting off what you don't need. This string frame must be taut, but not so tight as to warp the sticks.
4. Lay the sail material flat and place the stick frame face down on top. Cut around it, leaving about 2-3cm for a margin. Fold these edges over the string frame and tape or glue it down so that the material is tight.
5. Cut a piece of string about 122 cm long. and tie one end to the loop at the other end of the string to the loop at the bottom. Tie another small loop in the string just above the intersection of the two cross pieces. This will be the kite's bridle, the string to which the flying line is attached.
6. Make a tail by tying a small ribbon roughly every 10cm along the length of string. Attach the tail to the loop at the bottom of the kite.
7. Decorate!
Read more...
Saturday, September 11, 2010
Making a Chunk Candle
Making chunk candles is an and fun activity for all ages. A unique technique using wax chunks of different colors gives the finished candle a beautiful texture and look. They make a refreshing alternative to the usual pillar candles. Follow these step-by-instructions and make your own pretty chunk candles to gift or keep.
** It is assumed that the reader has a basic knowledge of preparing the candle mold by spraying oil and wicking it and also for setting and removing the finished candles from the mold. Anyone who has made a pillar candle before will find this project very easy to follow.
What You Need
* Wick
* Paraffin Wax
* Candle Mold
* Candle dyes in various colors
* Shallow Tray
Directions:
1. First you will need to prepare chunks. You can use leftover chunks from other candle projects. Or you make new ones by melting wax, adding color and allowing to set in a shallow pan. You can use either single-colored or multi-colored chunks.
2. Prepare the mold by spraying oil and wicking it. Then fill the mold with chunks.
3. Melt (un-dyed) wax and add to the mold. Allow to set completely.
Note: You can make different types of candles by altering the number of colors and chunks used. You can choose all your chunks to be of the same color or different colors. The color of the 'filler wax' can also be white or any other color that you choose to have.
You can also cut out all your chunks in similar shapes or keep mismatched ones.
Read more...
Wednesday, September 8, 2010
Foam Flower Crafts for Kids
Looking for free kids crafts? Learn how to make rose petals for foam flowers in this free video clip about easy foam crafts for kids.
Read more...
Tuesday, September 7, 2010
Coffee Filter Angel
This pretty little coffee filter angel is perfect as is, but you can dress her up with glitter to give her an extra special glow.
Decorate your whole home with festive Christmas crafts! Create homemade cards, your own Christmas ornaments, tasty Christmas recipes, or just snuggle up together with printable Christmas activities.
What you'll need:
* 3 basket style coffee filters
* 2 cotton balls
* 6-8” length of silver or gold ribbon
* 1 white chenille stem
* 1 gold chenille stem
* Scissors
* Hot glue gun
How to make it:
1. Place two cotton balls in the center of one of the coffee filters (see image).
2. Hold the coffee filter with your fingers, gathering the cotton balls in the center to create the angel’s head.
3. Place a second coffee filter onto the open end, tucking the filter in a bit into the head area. This will produce the layered effect on the dress (see image).
4. While still holding the filter together, tie a piece of gold or silver ribbon around the “neck” and tie a tight bow. Trim ends and set aside (see image).
5. Take the third coffee filter and fold it in half, then fold the filter up length-wise accordion style. Wrap a white chenille stem around the center, and then fan out the wings (see image). Fold the excess chenille into a loop for your hanger and twist together at the end.
6. Make a halo from the gold chenille by wrapping it around something circular, such as the top of a paint bottle. Twist the ends to form the halo. Trim the long end of the chenille, leaving approximately 3” (see image).
7. Have an adult hot glue the halo to the back of the angel so that it is positioned above the head.
8. Glue the wings in place behind the angel, hiding the gold chenille from the halo.
Tips:
* To embellish your angel, try using gold glitter glue or glue and glitter as decoration.
* We do not recommend using markers for facial features as the ink may bleed through the filter.
* If you really want to add facial features, try using a toothpick and acrylic paint.
Read more...
Make a Muffin Candle
With candle making, there are hardly any limits. You can replicate lots of things with your creativity. Here are some delicious 'Muffins' that look very, very inviting. I cannot recall the number of times I have used them to play pranks on 'unsuspecting targets'...lol.
Complete with chopped crayon bits for nuts and decorations, many people will mistake them for edible, freshly-baked, icing-topped muffins coming from your kitchen!
Materials Needed:
Candle Making Supplies (Wax, Dyes, Boiler, Wicks etc.)
Paper Muffin Cups (2-3 for one candle)
Whisk
Old Crayons (chopped into small pieces)
Directions:
1.Place 2-3 paper cups into each other for strength. Now, place them into individual muffin molds or a muffin tray for a string base. Grease them lightly if you wish, but it is not necessary.
2. Melt Wax, mix a dark or earthy colored dye for the muffin base. I used brown, but you can experiment. They are not real muffins after all!
3. Pour melted wax into the prepared 'molds'. Allow to cool and set. You can use a wick at this point. I have not used one because I made these 'muffins' just as a show-piece.
4. Meanwhile, prepare the 'frosting'. Melt wax and dye it a soft, creamy color. I used a pale, earthy brown again, but pinks, creams, blues, greens, yellows, peaches etc. look great for the icing. Be creative with your color combinations.
5. Cool the melted wax till you see a thin skin forming on it. Whip it with a whisk till it gets frothy. Quickly, spoon the froth over the muffin. If the wax solidifies before you are able to spoon enough froth, repeat the melting, cooling and whipping process.
6. While the frosting is still warm, sprinkle pieces of old crayons.
Read more...
Wedding candle decoration
These easy to make candles are perfect for using as decoration throughout the wedding and reception area. They can be made to match exactly with the rest of the wedding décor, and can double as favors for your guests.
Materials Needed:
1. Pillar candles of the same color or in colors that match the rest of your wedding decorations
2. Vellum stickers or stickers without a background color that match your wedding theme or colors
3. Plastic cup or paper cup
4. Popsicle stick
5. White glue
6. Decoupage paste (directions to make this are steps 3-5)
7. Paintbrush
Directions:
1. Begin by placing the vellum stickers on the candle in a random arrangement. If you are using border stickers, they look best along the top or bottom of the candle.
2. When you have finished placing the stickers where you would like them you can make your decoupage paste.
3. Put about a tablespoon of white glue in the plastic or paper cup.
4. Add a tablespoon of water.
5. Mix with the Popsicle stick.
6. Paint over the candle and stickers with the decoupage paste.
This same thing can be done using flower petals (fake or real), or even fabric adhered with glue dots.
Read more...
Folding Money into Shapes
Folding money into shapes can be a lot of fun. It is amazing how many shapes and characters you can make out of money. If you have a few dollars lying around, you may wish to try out some of these interesting origami projects using money.
Choose from many varieties of great shapes that money can be folded to resemble. To get started, find a few crisp dollar bills. The less worn the money is, the more likely it is to fold properly and hold its shape. Many of these origami designs can be done with standard paper, too. Be sure the shape and size of the paper is similar to that of a traditional bill.
Later, you can remove the folds and use the money. You are not cutting or tearing the money in any way. The following are a few designs to consider making.
Fold Money Boots
A fun choice is a pair of money boots. To complete this task, you will need two one-dollar bills, one for each of the pair.
1. Fold the bill in half lengthwise. Then fold the right side over onto the left, end to end. Do not match them up, but allow a half-inch difference from the top to the bottom.
2. Unfold the end-to-end fold. Then, fold the right side down, along the crease that was just made.
3. Fold the left side down along the same crease. The vertical line where the two folds meet is called the centerline. Note that the white edges around the bill should be on the outside of shape.
4. Then, fold the outer edges in to the centerline on both sides.
5. Fold the right bottom corner (the shorter side) from the centerline three times. This forms a tight, smaller end. Later, this end will be tucked into a tight space.
6. Fold the longer other side under the shorter end. When creating this fold properly, it forms a horizontal line. It crosses the centerline at a 90-degree angle.
7. Refold the centerline.
8. Take the shorter tab, wrap it around and tuck it into the flap on the other side. This creates the heel of the boot.
9. Pop the top portion open to form the body of the boot. You have created a money boot.
10. Repeat these steps to create another to have a pair of boots.
Origami Money Bow Tie
To complete your money look, create an origami money bow tie by following these steps. This is one of the oldest methods of money origami. It was a popular hobby in the 1970s!
Origami Money Bow Tie
1. Fold the bill in half with the President's picture on the inside. This should be a vertical, end-to-end fold.
2. Fold the bill in half from top to bottom.
3. Hold the bill so that the denomination number is in the lower left corner. Take the top layer of the four layers in that corner and fold it up. This allows two of the numbers to be showing and creates a triangle at the top.
4. Flip over and repeat on the other side. Use only the top layer of the money to create the fold.
5. Now, fold the flaps out so that only the front of the bill is showing.
6. Have the triangle of the bill face up. Take the front, bottom flap and fold it up to where it just comes to the bottom of the triangle.
7. Turn the bill over and repeat this step on the other side.
8. Take the both top corners of the side facing you and fold them down to meet the middle of the bill.
9. Flip the bill over and repeat for the other side.
10. Carefully pull the two ends away from each other so that the front is facing you. Flatten down the bill. You should now have a money bow tie.
Read more...
Wednesday, July 28, 2010
The Crown Napkin Fold
Do you want your dinner guests to feel like royalty but have no red carpet? Treat them like kings and give them all crowns! Then you can use this napkin to wipe the cheese out of that introduction.
This napkin folding design just doesn't work well without a little starch in the cloth, if it's sagging it's ugly so take your time and get it right.
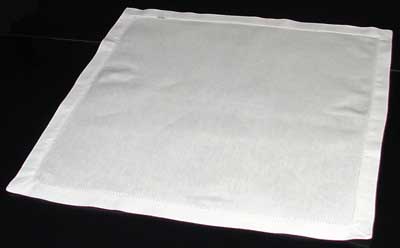
1. Lay the napkin face-down in front of you. | |
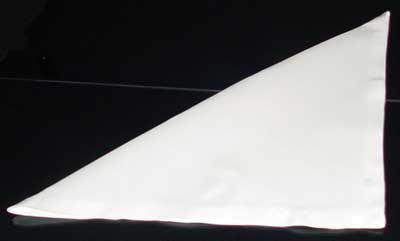
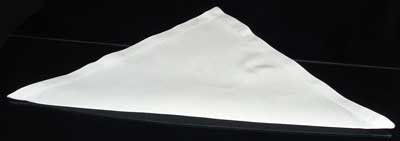
2. Fold the napkin in half diagonally. | |
3. Orient the napkin so the open ends are pointing away from you. | |
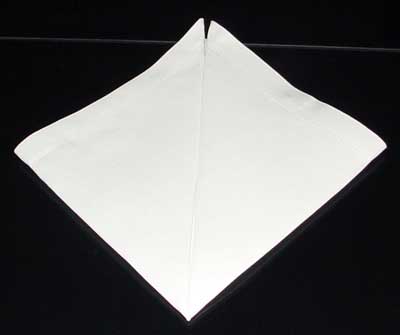
4. Fold the right-corner up so that the point rests directly on top of the middle-corner. The edge of this new flap should lay on the center line of the napkin. | |
5. Repeat step four on the other side, bringing the left-most corner up to meet the middle-corner, creating a diamond shape. | |
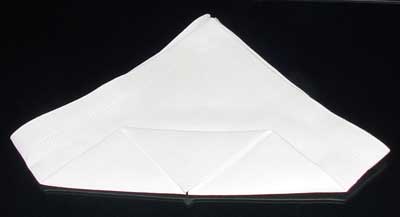
6. Fold the bottom of the napkin up about 2/4's of the way and press this fold down well. | |
7. Fold the smaller triangle down so the point rests on the near edge of the napkin. Press. | |
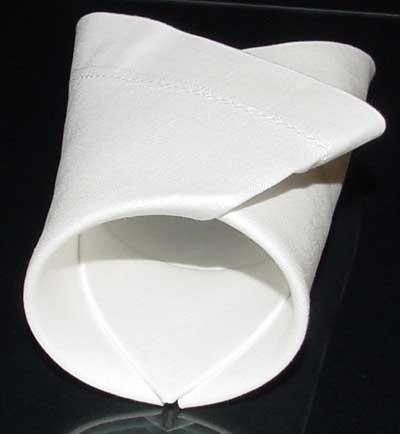
8. curl the left and right sides of the napkin up so they meet in the middle and tuck one into the other. | |
9. Stand it up and tug at it where needed to even it up and round it out. If your napkins are too limp then think of starch as napkin viagra and make them good and stiff. |
Read more...
Tuesday, July 27, 2010
Hand made gum paste roses using no cutter
How to make quick & easy GUM PASTE & FONDANT ROSES USING NO CUTTERS OR MODELLING TOOLS .....New sugarcraft modelling ideas
Read more...
How to Make a Paper Bag - 10 steps
This bag can be made in any size, out of any type of heavy paper. Use it to hold candy, popcorn or any small objects or gifts.
Cut a piece of heavy brown or white paper (craft paper or butcher paper) to 9 1/2 inches by 15 inches.
Step 2
Position the paper on a flat work surface (any patterned or decorated side should be facing down) so that the short edges are to your left and right. Fold the bottom edge up 2 inches and sharply crease the fold. Unfold.
Step 3
Use a ruler to find the center points of the top and bottom edges. Make two small pencil marks at the top edge of the paper, 1/2 inch to the left and 1/2 inch to the right of the center point. Repeat on the bottom edge. Turn the paper over and make the same marks on this side as well.
Step 4
Bring the right edge toward the center of the paper so that it lines up with the marks made to the left of the center point. Sharply crease the resulting right fold. Unfold the flap.
Step 5
Repeat step 4 for the left edge. Make sure that the left edge lines up with the marks made to the right of the center point. Turn the paper over.
Step 6
Bring the left and right edges to the same points as you did in steps 4 and 5. This time, however, glue the entire left edge to the right edge at the point where the edges overlap by an inch. Do not crease the edges. Allow the glue to dry thoroughly.
Step 7
Place the seamed side of the bag down. Push the left and right creases in about 1 1/2 inches so that they fold in toward the center. Lay the bag flat and crease the sides of the bag so that the folds are each sandwiched between the front and back of the bag.
Step 8
Locate the line of the crease made in step 2. This is the bottom of the bag. Fold the bottom edge of the bag up 4 inches and sharply crease. When you release the paper, the bottom edge of the bag should be slightly erect.
Step 9
Open up the bottom edges of the bag so that an upright, open-ended box is formed. The box should open up along the fold lines made in step 2 and this fold line should be touching the bag's surface. If you look down into the box, you should see two paper triangles facing each other.
Step 10
Push the side creases of the box inward and bring either free edge of the box down to lie flat. Bring the remaining free edge down on top of the other and glue it into place. Allow the glue to dry thoroughly and open the bag.
Read more...
Subscribe to:
Posts (Atom)