• Home
  • Tags
  • RSS
  • ME!
  • Edit

Tuesday, April 14, 2009

Christmas quilling designs

It is easy and fun to do. If you haven't tried quilling before you may like to start quilled Christmas card with my instructions page where you can learn how to coil the paper strips and make the basic shapes.

This page will walk you through two different Christmas quilling designs, a quilled Christmas wreath and a sweet little quilled angel.


Christmas quilling designs - card one

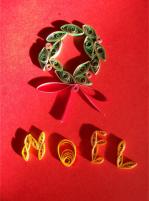
For the design on the card, left, I used 18-inch long gold edged quilling paper. This gives an extra sparkle. To recreate it yourself you will need papers in green, red and yellow and a plain red folded card.

The main shapes we will use for this quilled Christmas wreath are the marquise and pegs.

Getting started

Start by making twelve green marquise shapes for the wreath from half lengths (9") of paper. Arrange them into a roughly circular shape and carefully glue together. Remember, if you are using gold edged paper strips for your Christmas quilling designs, to keep the shapes the right way up so that the gold shows on all of them!

Make about four of five red pegs for the holly berries, from quarter lengths (4.5") of paper and attach them to the wreath where desired. You may also like to make a further red peg for the bow's knot.

For the ribbon bow, take a quarter length red strip and fold the ends toward the center and glue in place. Don't squash the ends flat, leave them rounded. A further quarter length strip of red paper is used for the ties of the bow. Attach the looped red paper to the bottom of the wreath. Add the ties and finally stick the red peg in place as a knot.

Letters and off center coils

You may want to add letters to your Christmas quilling designs. I have positioned the word Noel below my wreath.

The letter "O" has been made with an off centre circle. Roll the coil as normal from a half length piece of paper and drop it into the right sized hole in your quilling board. Once the shape has settled into its desired shape, glue the end. Leaving the shape in the board pull the centre of the coil towards the edge and hold it in place with a pin. Using a cocktail stick spread glue onto the area of the coil that sits between the pin and the edge of the hole in the quilling board. This will secure the coils in place, off centre. When the glue has dried carefully remove the pin.

The other letters were made with quarter lengths and pressed into marquise shapes. You will need ten made from quarter lengths and three smaller shapes (1/8th lengths). Each letter is two marquise high. Glue the shapes together to form the letters, as shown in the photo, and then attach to the card below the wreath. You may like to lay a ruler across the card so as to line up the bottom of the letters, but for a more informal effect lay them in place to create a deliberately haphazard appearance. This has the benefit of making any slight differences in letter height less noticeable.

Christmas quilling designs - card two
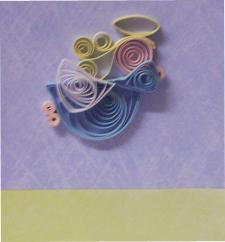
christmas-quilled-angel (7K) This little quilled angel fits on a small card or gift tag. I used a white card with green and blue paper stuck onto the front.

The pastel quilling paper I used was cut into 23 inch lengths. You will need pale blue, pink or peach, white, lemon or gold strips.

Start by making your angel's dress with a complete length of pale blue. Stick the end of the coil in place and shape into a semi-circle by pinching at both sides, but keeping your fingers close together so that more of the coil is left to form the rounded portion of the shape.

Use a quarter length of the same blue for the angel's arm and shape into a triangle.

Using a half length of white make another triangle for the wing.

The face is a quarter length of pink left circular. Tear a pink quarter length in half again to make three tight coils or pegs for her hand and feet.
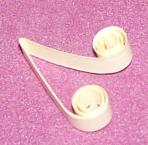
christmas-quilling-ideas (5K) For the first section of her hair we will use a quarter length strip of lemon folded in half. Coil one end towards the middle until you have about 1/2 inch left before the fold. Do the same with the other end making sure that both coils are going in the same direction. The photograph will show this better than words can.

Then take another quarter length and tear it in half. Coil almost to the end of the strip and leave it unstuck.

The halo is also made out of a quarter length strip of lemon. This time find a pen or similar cylindrical object and wrap the paper strip around it. Stick the end down and then slide the halo off the pen to form a circle with an open centre.

Making up your quilled angel

Stick the pieces of your angel together before you position it onto your card. In fact this is a good idea for all your Christmas quilling ideas!

Start by taking the dress and the face. Using a cocktail stick dab a tiny spot of glue onto the bottom of the face and stick it in place to the right hand side of the flat edge of the semi-circular dress. The photo of the completed card will assist you in the placement.

Take your double ended lemon coil and run a line of glue down the straight part, then push together leaving the coils at the end unstuck. Run glue round the top of the angels head and attach the sraight piece of hair. Stick the hair coil to the top of the dress where it touches.

Take the single lemon coil and attach to the head on top of the previous lemon strip to give a futher curl higher up the back of the head.

Position two of the pink pegs near the back of the curved edge of the dress for feet, and the third peg in front of the face for the angel's hand.

Glue the wing on top of the dress, overlapping one of the hair coils. Keep this towards the back of the dress but do not cover up the feet.

The blue arm shape is layered on top of the dress, face and hand, leaving part of the hand showing.

Lastly add the halo to the top of the quilled angel's head.

Turn your completed angel over and dab glue onto the back. Position your quilled angel onto the card and gently press into place.

I hope you have enjoyed working your first two free Christmas quilling designs, why not browse the site for more quilling ideas.


Read more...

Reminder Angel

Materials Needed:

  • 1 Large round woodise
  • 2 Large heart woodise
  • 5 Mini craft sticks
  • 3 Craft sticks
  • 1 Mini clothes pin
  • Paint
  • Pearl bead sting
  • Fine tip markers (very fine .5 or .1)
  • Tacky or elmers glue
  • Glue gun
  • Magnets or crafting wire
  • Newpaper
  • Waxpaper (to protect work surface)


Instructions:

First cover table with newspaper and lay waxpaper on top of that. This keeps the newspaper from sticking to your project.

Take your mini sticks first. They are the hardest to do. You want to place them where you have two sticks glued together at an angel, edge to edge making a v with it on the side of the sticks. You need two sets of these. Then you need to take the final mini stick and glue the two that make a v together with the mini stick in between them so you have a smooth center.

Glue three craft sticks together on the skinny sides so they are laying flat side by side. Glue on mini sticks so that there on top of the three mini sticks they should fit snuggly if done right where the sides fit over the three craft sticks and they are in three dimential ontop in a M shape. This is the angels skirt so place it towards the bottom but not at the bottom of the craft sticks.

Glue on the head on top of the craft sticks above the mini sticks. Add the heart woodsies to the back to make wings. I usually do the hearts with a glue gun they last longer that way. Glue mini clothes pin on the center mini stick at the bottom of the skirt. Once it is glued together and dried, then peel from the waxpaper should come off really easily.

Paint as desired. Once the paint is dry, spray with an acrylic sealer. Once that is dry, add your beaded pearls around the head.

Write REMINDER ANGEL with small tip marker down the center. Place your business card or pocket card in it to give away or sell. This is to keep track of appoinment cards and have them in one handy place. I always take the appointment card for the next date upcoming and put it on top.


Read more...

Thursday, April 9, 2009

Cool Button Pendant


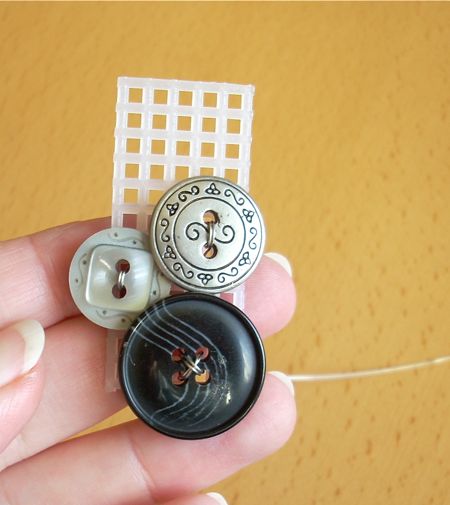
So, you begin with some small pieces of plastic canvas. The 10-count variety is best - the more-commonly available stuff with the larger holes. Start with a piece that’s roughly the size you want your finished pendant to be, plus a little larger. This is a very flexible project, so you can always cut away excess canvas, or even add more later.


Next, gather some cool buttons. You’ll want a mix of sew-through and shank buttons. And you’ll also need some coated copper craft wire in either 24-gauge or 28-gauge. I like 24 myself, but if that seems to stiff to handle, try some 28. You can use any color of wire, by the way.

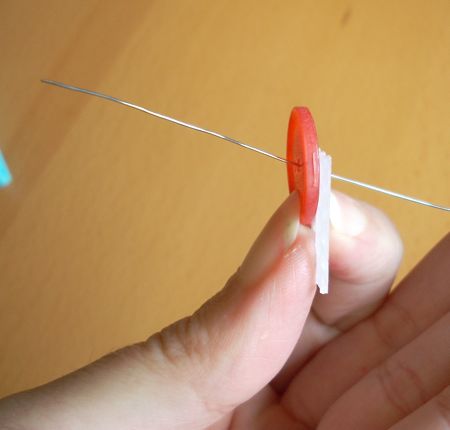
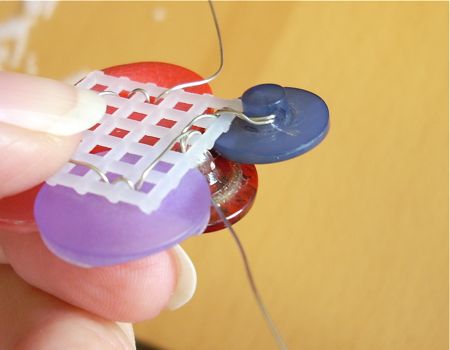
Okay, new we’re going to wire these buttons to the plastic canvas. Begin with one of your sew-through buttons. Position it on the canvas and move it slightly until you’ve lined up the holes in the button with the holes in the canvas. (You’re looking at the blue handles of my scissors through the holes here.)

Take about an arm’s-length piece of wire. Thread one end through the first set of holes, passing through the button and the canvas. Pull the wire through until there’s about a 6″ tail of wire sticking out from the back of the canvas.

Poke the leading end of the wire back down through the other set of holes - again, passing through both the button and the canvas. Carefully pull the wire through until you have just a little stitch or wire on top of the button. (If your button is a four-hole button, then take another stitch with the wire through those holes, too.)

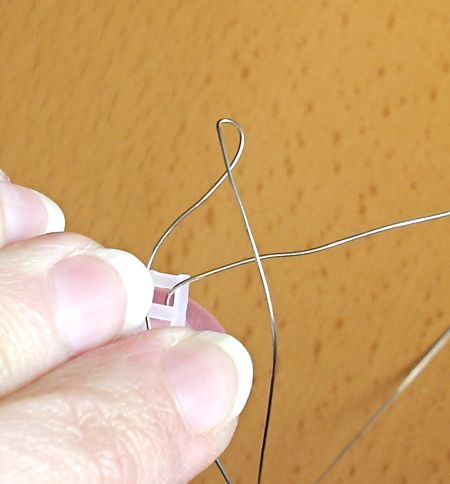
Now, here’s something to watch out for as you pull your wire through the canvas: it will want to twist up, like this. Take lots of care to avoid these twists! If you pull twisted wire too much, it will kink, and kinked wire can easily break. So, any time your wire begins twisting, stop a moment and un-twist it before you continue pulling.

Let’s add a shank button to our pendant now. Shanks are great, because they can overlap the sew-through buttons and give your pendant some nice dimension.

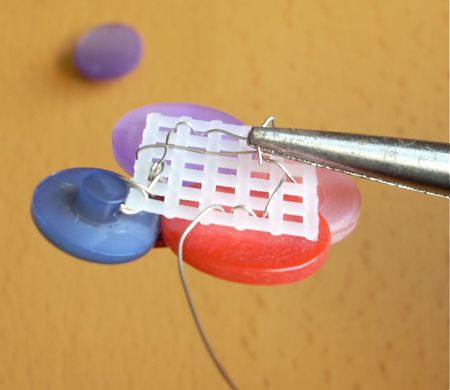
Place your shank button where you like it on the pendant, and then look at it from the side, like this. Make sure the hole in the shank is in a location you can easily reach. (If it’s not, just spin the button around.) And then, guide the leading end of the wire up through the canvas so that it’s close to where this hole is.

Now that you have the wire positioned, you can thread the button onto it. Scoot it down the wire until it’s back in place on the pendant.

. . . And then pass the wire back down through the canvas, and pull it tight. Apologies for the focus here.

This is a good time to mention: for sew-through buttons, I’ve found that one set of wire stitching is plenty to hold it to the canvas. For shank buttons, I like to stitch them twice, so they don’t flop around.

If you’re using vintage buttons that have wire shanks, these will always have a tendency to flop. You may have to anchor them with a little glue later on.

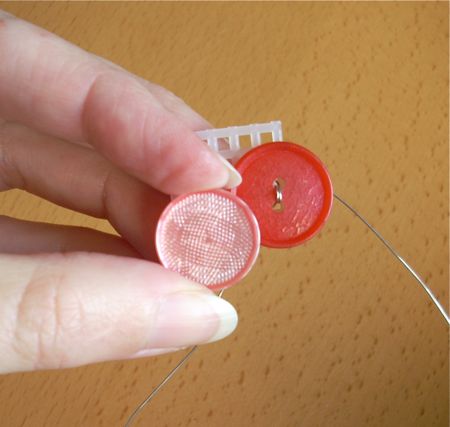
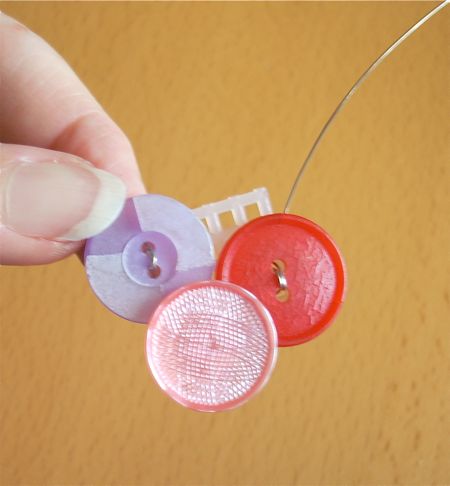
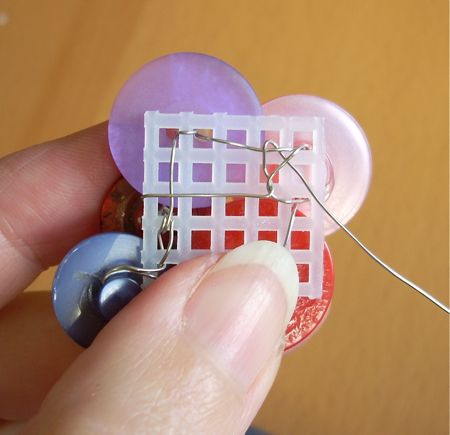
Keep wiring buttons to your pendant. You can really get creative, stacking buttons on top of each other, and you can of course add beads and other embellishments.

You can even wire a button to the outside edge of your canvas, as seen here. Or, if you decide to make your pendant larger, you can cut a second piece of canvas and wire it to the back of the first one.

When you’re done wiring on buttons, flip your pendant over. You’ll have all these stitches on the back. Finish off the two loose ends of your wire by weaving them under a few of these stitches.

Cut the end very short, like 1/4″ or less, and then use some needle-nose pliers to bend that end down into the canvas, so it won’t stick you when you wear your pendant. Finish off both loose ends this way.

Install a large jump ring through the canvas, and you’re all set. String this bad-boy on something and wear it!

By the way, sometimes you’ll end up with excess canvas sticking out from under the buttons. No worries - you can simply cut this away with scissors.

. . . And your wire-cutters can help you reach into tighter spots.

See? Custom-shaped backing. You can also cover this back with felt, if you’re so inclined.


Read more...

Button Flower Garden


You Will Need
Pattern
Tracing paper
Pencil
Ruler
Scissors
Six two-hole or shank buttons measuring from 5/8 to 7/8 inch across in colors of your choice (Carrie used four shank and two two-hole buttons)
12-inch-long chenille stems (pipe cleaners), two green and one orange
One sheet or scraps of green craft foam
2 x 5-inch piece of 1-inch-high green Styrofoam (or a piece of white packing foam painted green)
Black felt-tip marker


What to Do
1. For the flower stems, cut six 3-inch-long pieces of green chenille stem.

2. To make the flowers, add either a shank button or two-hole button to one end of each flower stem in the following way:
  • To add a shank button, pull one end of a stem through the opening in back of the button and bend the end down to hold the button in place.

  • To add a two-hole button, pull one end of a stem from back to front through one hole of the button. Pull the same end from front to back through the second hole to hold the button in place.
3. Trace the leaves pattern onto tracing paper and cut out. Lay this pattern onto the green craft foam and trace around its shape with pencil. Trace five more sets of leaves in the same way. Cut out the leaves.

4. Poke the bottom end of a stem through the center of a pair of leaves. Pull the leaves up so they are about 1/4 inch below the button flower. Add leaves to each stem in same way.
Worm: Cut one 2-inch-long piece of orange chenille stem. To form the worm's head, bend down the first 1/4 inch, then curl this same end down another 1/4 inch.

5. Use the black felt-tip marker to draw a dot on each side of the head for eyes.

6. Referring to the photo for position, push the flower stems and worm into the 2- x 5-inch block of green foam, pushing some pieces deeper so they appear to be shorter. Place drops of red and yellow food coloring randomly over frosting. With a spatula, blend colors randomly over frosting.

Leaves Pattern
Trace 1 -- tracing paper
Cut 6 -- green craft foam

Finished size: Button flower garden is 4 1/4 inches high x 5 inches long x 2 inches wide.


Read more...

Beautiful Paper Snowflake


How To Make The Most Beautiful Paper Snowflake Ever! a spectacular - origami like - snowflake deco


Step 1

This is the material you will need for this how to :)

Step 2

Fold the sheet of paper into a triangle

Step 3

Cut the exceeding piece of paper to make a perfect triangle

Step 4

Fold the triangle again to make a smaller triangle

Step 5

With a pencil, mark four equal points to guide you with your cut.

Step 6

Make a cut following the length of the triangle and stop a little bit before the edge.

Step 7

Make the second cut in the same direction, stopping just a few millimeters before the first cut.

Step 8

Make all your cuts.

Step 9

Put the triangle on the table.

Step 10

Unfold it. You now have a square.

Step 11

Fold the two center cuts and glue them together. Use your finger as shown in the picture, holding the pieces together for a few seconds and allowing them to dry a bit.

Step 12

Turn over the square. Fold the two second cuts and glue them together. Use your finger as shown in the picture, holding the pieces together for a few seconds and allowing them to dry a bit.

Step 13

Turn over the square. Fold the third cuts and glue them together. Turn over the square. Fold the fourth cuts and glue them together. Turn over the square. Fold the fifth cuts of the cut paper and glue them together.

Step 14

You have the first point of your snowflake.

Step 15

Repeat those 13 steps 5 more times, making in total the 6 points required to complete your

Step 16

Glue together the side part of each point to build your snowflake

Step 17

Hold the paper together with you finger for a few seconds to allow the glue to dry a bit.

Step 18

Glue the last side to side point.

Step 19

You can use a paperclip to hold the final part. Allow the glue to dry at least one hour.

Step 20

Glue the sides of three of the points and then glue the three ends together. Repeat this for the other three points. Then glue these two halves together.

Step 21

Your snowflake is done.

Step 22

Use a nice ribbon to hang the snowflake.


Read more...

Wednesday, April 8, 2009

Japanese Paper Ball (Kusudama)


Read more...

Sunday, April 5, 2009

Heart Appliqué Pillow


Supplies:

Fabric of Choice (amount will vary depending on pillow size)

Pillow Form

Fabric scraps of choice

Gathered Lace Trim (amount will vary depending on pillow size)

16 Buttons

Fusible Web

Embroidery Thread

Needle and thread to match fabric

How to:

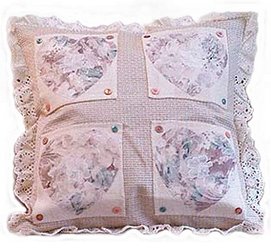
This pillow is made to fit a 20 inch pillow form, but these can be made in any size you like. You will need three different fabrics. One for the pillow base, one for the squares and one for the hearts. I used fabric samples for this entire pillow cover. Check your local fabric and decorating shops for sample pieces; they are usually very affordable.

I used two different fabrics for the front and back of the pillow. Only because my sample pieces were not large enough to make both sides the same. Cut one 21 inch square piece for the front and another for the back.

Cut four squares to a suitable size [plus one inch] from your second fabric and cut four heart shapes from your third fabric. Refer to photo as a reference for size and placement.

With right side facing down, turn over a one half inch seam to all sides of the four small square pieces and press with an iron to hold. Using double sided fusible web, attach one side of web to each of the four squares and each of the four heart shapes (follow manufacturer instructions for application of fusible web).

Peel the backing off of each square and iron in place to the front piece of your pillow. On top of the squares, iron your heart shapes in place. Sew in place one button to each corner of the four squares using embroidery thread.

Hand stitch, using embroidery thread around each heart shape. This stitching can be uneven and either a simple slip stitch or blanket stitch can be used. This stitching is not only is decorative, but insures that if the fusible web ever loosens, the pieces will remain in place.

Attach your lace trim by stitching your lace to the right side edge of your front piece of fabric (right sides together with lace outer edge, facing toward the center of the pillow). Use a large stitch or basting stitch as this will be held more secure with later stitches. Pin right sides together of the front and back piece, making sure that your lace trim will not interfere with your stitches and sew around all four sides of the pillow cover, leaving an opening large enough to turn the pillow right side out. Depending on the weight of the fabric you use, the opening may require a fairly large space.

Once you have sewn the front and back together, clip the four corners to allow for cleaner corners once turned right side out. Turn your pillow cover right side out, insert pillow form and hand [or machine] stitch the opening closed.
Read more...

Friday, April 3, 2009

Funny stories collection: 15/03/09 Collection

Funny stories collection: 15/03/09 Collection
Read more...