


It is easy and fun to do. If you haven't tried quilling before you may like to start 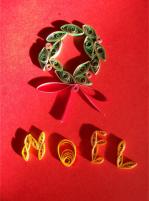 with my instructions page where you can learn how to coil the paper strips and make the basic shapes.
This page will walk you through two different Christmas quilling designs, a quilled Christmas wreath and a sweet little quilled angel.
Christmas quilling designs - card one
For the design on the card, left, I used 18-inch long gold edged quilling paper. This gives an extra sparkle. To recreate it yourself you will need papers in green, red and yellow and a plain red folded card.
The main shapes we will use for this quilled Christmas wreath are the marquise and pegs.
Getting started
Start by making twelve green marquise shapes for the wreath from half lengths (9") of paper. Arrange them into a roughly circular shape and carefully glue together. Remember, if you are using gold edged paper strips for your Christmas quilling designs, to keep the shapes the right way up so that the gold shows on all of them!
Make about four of five red pegs for the holly berries, from quarter lengths (4.5") of paper and attach them to the wreath where desired. You may also like to make a further red peg for the bow's knot.
For the ribbon bow, take a quarter length red strip and fold the ends toward the center and glue in place. Don't squash the ends flat, leave them rounded. A further quarter length strip of red paper is used for the ties of the bow. Attach the looped red paper to the bottom of the wreath. Add the ties and finally stick the red peg in place as a knot.
Letters and off center coils
You may want to add letters to your Christmas quilling designs. I have positioned the word Noel below my wreath.
The letter "O" has been made with an off centre circle. Roll the coil as normal from a half length piece of paper and drop it into the right sized hole in your quilling board. Once the shape has settled into its desired shape, glue the end. Leaving the shape in the board pull the centre of the coil towards the edge and hold it in place with a pin. Using a cocktail stick spread glue onto the area of the coil that sits between the pin and the edge of the hole in the quilling board. This will secure the coils in place, off centre. When the glue has dried carefully remove the pin.
The other letters were made with quarter lengths and pressed into marquise shapes. You will need ten made from quarter lengths and three smaller shapes (1/8th lengths). Each letter is two marquise high. Glue the shapes together to form the letters, as shown in the photo, and then attach to the card below the wreath. You may like to lay a ruler across the card so as to line up the bottom of the letters, but for a more informal effect lay them in place to create a deliberately haphazard appearance. This has the benefit of making any slight differences in letter height less noticeable.
Christmas quilling designs - card two
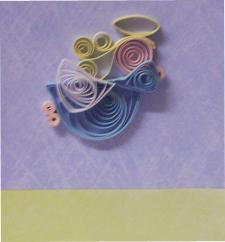 This little quilled angel fits on a small card or gift tag. I used a white card with green and blue paper stuck onto the front.
The pastel quilling paper I used was cut into 23 inch lengths. You will need pale blue, pink or peach, white, lemon or gold strips.
Start by making your angel's dress with a complete length of pale blue. Stick the end of the coil in place and shape into a semi-circle by pinching at both sides, but keeping your fingers close together so that more of the coil is left to form the rounded portion of the shape.
Use a quarter length of the same blue for the angel's arm and shape into a triangle.
Using a half length of white make another triangle for the wing.
The face is a quarter length of pink left circular. Tear a pink quarter length in half again to make three tight coils or pegs for her hand and feet.
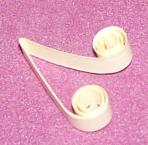 For the first section of her hair we will use a quarter length strip of lemon folded in half. Coil one end towards the middle until you have about 1/2 inch left before the fold. Do the same with the other end making sure that both coils are going in the same direction. The photograph will show this better than words can.
Then take another quarter length and tear it in half. Coil almost to the end of the strip and leave it unstuck.
The halo is also made out of a quarter length strip of lemon. This time find a pen or similar cylindrical object and wrap the paper strip around it. Stick the end down and then slide the halo off the pen to form a circle with an open centre.
Making up your quilled angel
Stick the pieces of your angel together before you position it onto your card. In fact this is a good idea for all your Christmas quilling ideas!
Start by taking the dress and the face. Using a cocktail stick dab a tiny spot of glue onto the bottom of the face and stick it in place to the right hand side of the flat edge of the semi-circular dress. The photo of the completed card will assist you in the placement.
Take your double ended lemon coil and run a line of glue down the straight part, then push together leaving the coils at the end unstuck. Run glue round the top of the angels head and attach the sraight piece of hair. Stick the hair coil to the top of the dress where it touches.
Take the single lemon coil and attach to the head on top of the previous lemon strip to give a futher curl higher up the back of the head.
Position two of the pink pegs near the back of the curved edge of the dress for feet, and the third peg in front of the face for the angel's hand.
Glue the wing on top of the dress, overlapping one of the hair coils. Keep this towards the back of the dress but do not cover up the feet.
The blue arm shape is layered on top of the dress, face and hand, leaving part of the hand showing.
Lastly add the halo to the top of the quilled angel's head.
Turn your completed angel over and dab glue onto the back. Position your quilled angel onto the card and gently press into place.
I hope you have enjoyed working your first two free Christmas quilling designs, why not browse the site for more quilling ideas.


1 comments:
ai vậy? mình thấy bạn đố mình bạn là ai, thấy khó quá.
Post a Comment
Please leave your comment here ^)^